

Table of Contents
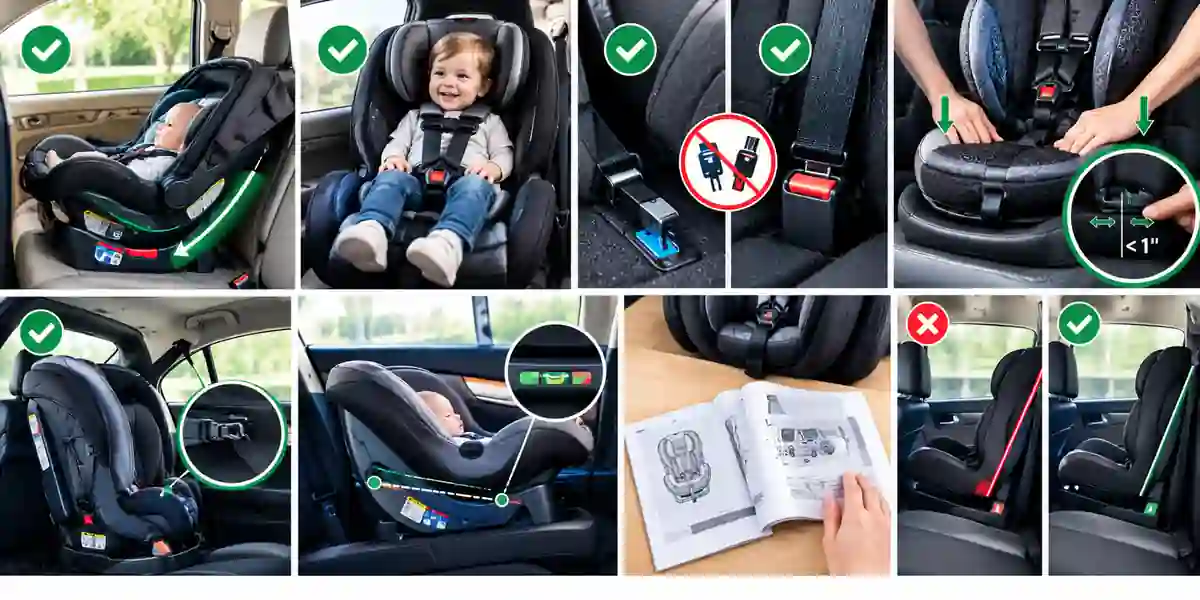
To install a car seat, place it in the back seat facing the correct direction for your child’s age and size: rear-facing for infants and toddlers, since that position protects the head, neck, and spine far better in a crash, and forward-facing with a harness only after your child outgrows the seat’s rear-facing limits. Secure the seat with either the LATCH system or the vehicle’s seat belt, never both at once. Press the seat firmly into the cushion while you tighten, then confirm it moves less than one inch at the belt path. For forward-facing seats, always attach the top tether, because it sharply reduces head movement in a crash. For newborns, set the recline angle the indicator shows, and always read both your car seat and vehicle manuals first.
Key Takeaways
• Install every car seat in the back seat, and never in front of an active airbag.
• Use either the LATCH system or the vehicle seat belt to secure the seat, not both at once.
• A correct install moves less than one inch side to side when you pull at the belt path.
• Always use the top tether for forward-facing seats. It is one of the most skipped steps.
• Rear-facing is the safest direction. Keep your child rear-facing as long as the seat allows.
• When in doubt, get the install checked by a certified Child Passenger Safety Technician.
Let me guess how you ended up here. The car seat is sitting in your living room, the manual is roughly the length of a short novel, and you have that quiet worry every parent gets: what if I do this wrong? Take a breath. You are not bad at this. Car seats are genuinely fiddly, and the fact that you are reading a full guide about it already puts you ahead of most people on the road.
Here is what I have learned from digging through NHTSA guidance, AAP recommendations, and more installation manuals than I can count: installing a car seat correctly comes down to a handful of principles, and once they click, you can handle almost any seat. Infant carrier, convertible, forward-facing harnessed seat from Safety 1st, Evenflo, or Baby Trend, it does not matter. Same principles, every time. This guide covers them all: LATCH versus seat belt, how to install an infant car seat with or without its base, forward-facing steps for the big brands, what a car seat LATCH anchor kit actually does for older cars, and the two-minute checks that prove your install is solid. Everything follows current NHTSA and AAP guidance, verified for 2027.
The Two Ways to Install a Car Seat: LATCH vs Seat Belt
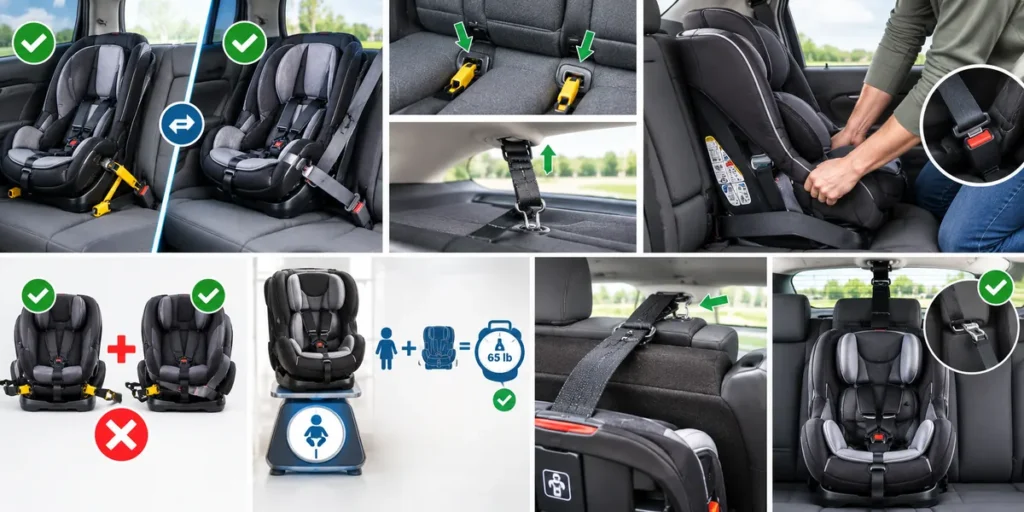
Here is the first thing that surprises most parents: there are exactly two ways to install any car seat sold in the US. LATCH, or the vehicle’s seat belt. That is the whole list. And here is the second surprise: neither one is safer than the other. I know, LATCH sounds fancier. It has anchors and connectors and an official-sounding acronym. But NHTSA is clear on this. A correct seat belt install protects just as well as a correct LATCH install. So forget which method sounds better. The right method is whichever one gives YOU the tightest install in YOUR car with YOUR seat. That is the entire decision.
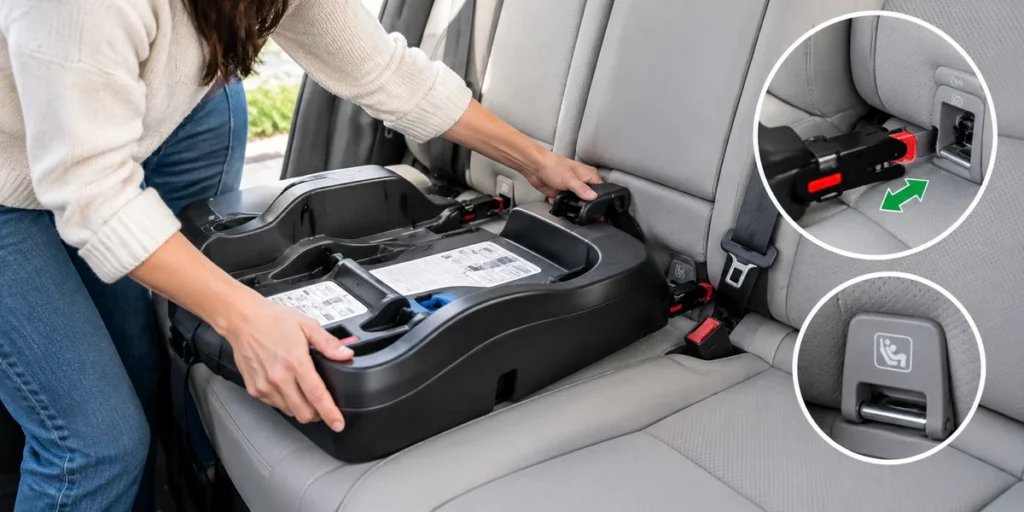
Quick refresher on what LATCH actually is, since the manual tends to assume you already know. LATCH stands for Lower Anchors and Tethers for Children. Your car has them built in: two lower anchors hiding in the crack where the back cushion meets the seat cushion, plus top tether anchors somewhere behind the seat. Could be the rear shelf, the seatback, the ceiling, the floor. Every car is a little different, which is why your vehicle manual matters here. Your car seat has straps with connectors that clip onto those anchors. Click, tug, done. Most cars built after September 1, 2002 have LATCH, so unless you are driving something truly vintage, you have it.
Seat belt installation is the older method, and older does not mean worse. You thread the car’s seat belt through the car seat’s belt path, buckle it, lock it, and tighten. Modern belts lock for this purpose. Either the retractor locks when you pull the belt all the way out slowly (you will hear it clicking as it feeds back in), or the latch plate itself locks. Your vehicle manual tells you which type you have. Then comes the part nobody warns you about: you basically kneel in the car seat. Put your knee in it, put your weight into it, and pull the slack out of the belt while you do. It feels undignified. It works.
Now the rule people break without realizing: pick ONE. Not both. I get why doubling up feels safer. Two systems must be better than one, right? Wrong, unfortunately. The seat was crash-tested with one method at a time. Using both can pile crash forces onto the seat in ways it was never tested for, and worse, it can fool you. One system ends up doing all the work while the other just sits there looking helpful. Unless both manuals explicitly bless the combo, which is rare, one method only.
One more LATCH rule, and this one hides in the fine print: the 65-pound rule. The lower anchors are rated for 65 pounds total. That is your child plus the car seat, added together. Cross 65 and you switch to a seat belt install. Most parents never do this math because nobody tells them to. So do it now. Weigh your kid, check the seat’s weight on its label, add them up. If you are over, seat belt it is.
Speaking of the tether: if your seat faces forward, the top tether is not optional. It is a strap at the top back of the car seat that hooks to your car’s tether anchor, and it cuts down how far your child’s head flies forward in a crash. Enormous safety gain. Tiny effort. And yet it is one of the most skipped steps out there. Make it automatic. Forward-facing means tethered. Every single time, no exceptions, no ‘we are just going around the block.’
How to Install an Infant Car Seat
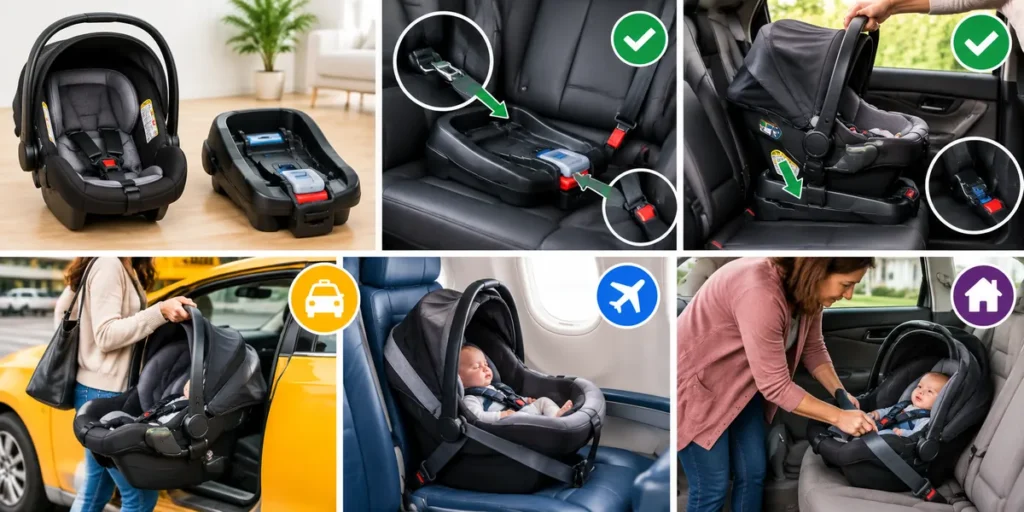
The infant bucket seat. The one with the handle. The one you will click in and out of its base approximately four thousand times. Learning how to install an infant car seat really means learning two separate skills, because life will demand both: the base install for everyday use, and the baseless install for taxis, flights, and grandma’s sedan. Learn both now, thank yourself later.
Installing the infant seat base with LATCH
1. Set the base in the back seat where you want it. Fun fact: the center rear is statistically the safest spot, but only if you can get a rock-solid install there and both manuals allow it. A tight install outboard beats a wobbly one in the center every time.
2. Click the base’s LATCH connectors onto the car’s lower anchors. Listen for the click on each side, then yank each one. A real connection does not budge.
3. Now the knee trick. Press your knee into the base, put your weight on it, and pull the LATCH strap tail to take up the slack. Keep going until the base moves less than an inch side to side at the belt path.
4. Set the recline. Newborns need to ride fairly reclined, around 45 degrees, or their heavy little heads can tip forward and narrow the airway. Your base has an indicator for this: a line that must sit level, a bubble in a zone, a ball in the colored area. Adjust the recline foot until it reads right for a newborn.
5. Click the carrier into the base. Listen for that satisfying click, then pull up on the carrier. If it lifts off, it was not locked. Try again.
Installing the infant seat base with the seat belt
1. Place the base, then thread the car’s lap and shoulder belt through the base’s belt path. Infant bases are picky about this. There is one correct path, often with a built-in lock-off clip, so follow the labels.
2. Buckle up. If your base has a lock-off, clamp it shut over the belt and you are done with locking. The lock-off does the holding, so do not also lock the retractor. If there is no lock-off, lock the belt the way your vehicle manual describes.
3. Knee in the base, pull the slack out, and confirm the inch-or-less movement at the belt path. You know the drill by now.
4. Dial in the recline with the indicator, click the carrier in, and confirm the lock with an upward pull.
If your base has a lock-off, honestly, enjoy it. It is one of the best little inventions in the car seat world. It clamps the belt tight for you and skips the whole retractor-locking dance. Just use it exactly the way the manual shows. And resist the urge to lock the retractor ‘just in case.’ Doubling up can actually fight the lock-off, which defeats the purpose.
Installing the infant carrier without the base
1. Set the carrier rear-facing in the back seat. Put the handle in whatever position your manual demands for travel. Usually upright or a specific locked notch. This detail matters more than people think.
2. Thread the car’s lap and shoulder belt through the carrier’s baseless belt path. Look for the blue guides on the sides. Blue means rear-facing routing on virtually every seat.
3. Buckle, then lock the retractor: pull the shoulder belt all the way out slowly until it switches into locking mode, then let it feed back while you press the carrier hard into the vehicle seat.
4. Check the recline. Without the base’s indicator you are on your own, so use the carrier’s angle guide, and if your manual allows it, a tightly rolled towel or pool noodle under the front edge to hit that newborn angle.
5. Inch test at the belt path, handle locked in position. Done.
Do yourself a favor and practice the baseless install in your driveway this weekend. It takes two or three tries before your hands know what to do, and you really do not want try number one happening at an airport curb with a crying baby and a taxi meter running.
How to Install a Car Seat Forward-Facing
Sooner or later comes the big milestone: turning the seat around. Here is the thing most parents get backwards, though. Forward-facing is not an upgrade. It is not a graduation. Rear-facing is safer, full stop, and the AAP says to keep kids rear-facing as long as possible, until they max out the height or weight limit for rear-facing on their specific seat. Many convertibles today go to 40 or even 50 pounds rear-facing, which carries most kids past age two and often to three or four. When your child genuinely outgrows those limits, then you turn. Not before, not because the birthday came, not because their legs look cramped. (Legs looking cramped, by the way, is not a safety problem. Kids are bendy. Broken legs in a crash are fixable. Spinal injuries are not.)
When the day does come, here is the sequence:
1. Set the seat forward-facing in the back seat, flat against the vehicle seatback. It should look upright and purposeful, not lounging.
2. Find the FORWARD-facing belt path. This is the big one. Convertible seats have two belt paths, and they are color-coded for a reason: usually blue for rear-facing, red or orange for forward-facing. Using the wrong path is one of the most serious mistakes you can make, so actually look at the labels. Do not go by memory.
3. Connect your chosen method. LATCH connectors onto the lower anchors, or seat belt through the forward-facing path, buckled and locked.
4. Knee in the seat. You know this move now. Compress it into the vehicle cushion and pull every bit of slack out of the strap or belt. Then the inch test at the belt path.
5. Top tether. Route it over the top of the vehicle seatback following your vehicle manual’s diagram (the routing varies more than you would expect), hook it to the tether anchor, and pull it snug. Not optional. Not later. Now.
6. Harness your child. Tighten until you cannot pinch any slack at the collarbone. Forward-facing means straps at or ABOVE the shoulders, chest clip at armpit level. Say it with me: forward, at or above.
The steps do not change between brands. But every brand has its little quirks, and parents ask about three of them constantly. So here are the brand-specific notes.
How to install a Safety 1st car seat front facing
Safety 1st seats like the Grow and Go 3-in-1 are refreshingly straightforward once you know where to look. Thread the LATCH strap or seat belt through the forward-facing belt path on the shell, keeping the strap flat. No twists. Twists are sneaky little force-concentrators, so smooth them out. Depending on your model you will either use the built-in belt lock-off or lock the vehicle belt itself. Your manual says which. Do not improvise here. One genuinely nice touch on many Safety 1st seats: little harness holder clips that keep the straps out of the way while you load your kid. Anyone who has wrestled a toddler while fishing for a buried harness strap will appreciate this more than words can say. Finish the usual way: tether on, inch test passed, harness at or above the shoulders, clip at the armpits. Lost your manual? Safety 1st keeps current manuals on its website. Download it. Never install from memory.
How to install an Evenflo car seat forward facing
Evenflo’s seats, the Tribute, Chase, Maestro family, have their own connector personality. The LATCH connectors on many models are the push-button or hook style. Push them firmly onto the lower anchors until you hear the click, then tug. A proper connection laughs at your tugging. Belt install? Through the forward-facing path, then either the seat’s lock-off or a locked vehicle belt, per your manual. Two Evenflo-specific gotchas to watch. First, the tether routing around adjustable headrests. Evenflo manuals have a diagram for your exact model showing whether the tether goes over or under, and getting this wrong is easy. Check the picture. Second, and this one bites everyone converting a seat they have used rear-facing for two years: the LATCH strap is probably still sitting in the rear-facing belt path. You have to physically move it to the forward-facing path. It will not migrate on its own, no matter how much you wish it would. Then the finale you could do in your sleep by now: inch test, snug harness, straps at or above, clip at armpits.
How to install a Baby Trend car seat forward facing
Baby Trend’s forward-facing seats, like the Trooper 3-in-1 and CoverMe 4-in-1, start with one setting people overlook: the recline. These seats have a defined forward-facing recline position, more upright than the rear-facing sprawl. Set it first. Then the familiar routine: seat flat in the back seat, LATCH strap or vehicle belt through the marked forward-facing path, connect or buckle, knee in, tighten, inch test. Baby Trend manuals make a point about overhang, and it is worth respecting: the seat needs to sit substantially on the vehicle cushion, not cantilevered off the edge like a diving board. If too much of the base hangs past the seat edge, move to a different seating position. Then tether, snug it, harness the kiddo, straps at or above the shoulders, chest clip at armpit level. And yes, the manual again. Models differ in small ways, and small ways matter here.
Rear-Facing Installation: The Essentials
Rear-facing gets its own section because it is simultaneously the safest way for little ones to ride and the mode with the pickiest rules. The AAP’s position is simple and worth repeating: rear-facing as long as possible, until your child hits the max height or weight for rear-facing on that specific seat. With modern seats reaching 40 to 50 pounds rear-facing, that is a lot of childhood.
What changes versus forward-facing? Three things. One, the belt path: rear-facing path, usually blue. Two, the recline: newborns need that roughly 45-degree angle so their airway stays open, and you set it with the seat’s indicator, not by eyeballing it. Older babies can ride more upright, but only as upright as the manual allows. Three, the tether: do NOT use the top tether rear-facing. I know it feels wrong to leave a strap unused. Do it anyway, unless your specific manual explicitly describes a rear-facing tether option, which only a handful of seats offer.
And memorize this, because it is the single most confused detail in all of car seat land: harness height. Rear-facing, straps sit at or BELOW the shoulders. Forward-facing, at or ABOVE. Rear is below, forward is above. Tattoo it on your brain. Okay, maybe not literally. But close.
One last rear-facing note, mostly for grandparents: the carrier handle and the front seat. Your manual dictates which handle positions are allowed in the car, and most manuals want some breathing room between the car seat and the front vehicle seat. Check both manuals. Grandparents mean well, but ‘we did it differently in my day’ is not a safety standard.
Car Seat LATCH Anchor Kits: What They Are and When You Need One
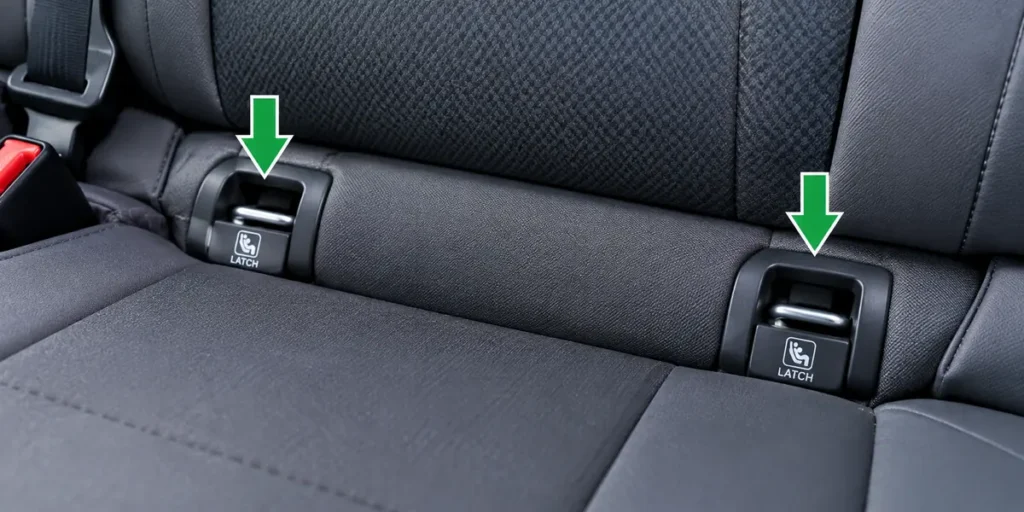
A car seat LATCH anchor kit is a retrofit part meant to add LATCH anchors to a car that was built without them. Since LATCH became mandatory for most vehicles built after September 1, 2002, we are talking about older cars here. The beloved old Camry. The classic truck. That import with character. If your daily driver predates the mandate and you want LATCH, keep reading.
Here is the straight story. Top tether anchors? Often retrofittable. Many automakers sell tether anchor retrofit kits for older models, and a dealership can install one in the factory-designated spot. This is genuinely worth doing, because the tether is such a heavy hitter for forward-facing safety. Lower anchors, the ones in the seat crease? Generally not retrofittable. They are welded into the car’s structure at the factory. There is no safe way to bolt them on afterward, no matter what the internet wants to sell you.
And that brings us to the part where I need to be blunt. You will find generic ‘universal’ LATCH anchor kits online promising to add lower anchors to any car with some straps or bolts. Do not buy them. An anchor that was not engineered, crash-tested, and approved for your exact make, model, and year is a decoration, not a safety device. And please never drill your own anchors into the car. Only use retrofit parts made or approved by your vehicle manufacturer, installed by a dealership or qualified mechanic, in the factory-designated location. Everything else is gambling with your kid.
Now the good news, and it is genuinely good: you do not need a kit at all. A seat belt installation in an older car is completely, totally safe when done right. Kids rode safely for decades before LATCH existed. So if your car has no LATCH, install with the seat belt, lock it properly, pass the inch test, and drive with confidence. No kit required. Problem solved for free.
The Inch Test and Final Safety Checks
Two minutes. That is all this takes, and it is the difference between hoping the seat is safe and knowing it. Run these checks on installation day and honestly, make them a habit.
1. The inch test. Grab the seat right at the belt path, where the LATCH strap or seat belt runs through, and shove it side to side, then front to back. More than an inch of movement? Not done yet. Tighten more. And test at the belt path only. The top of the seat will always wiggle more, and that is normal. The belt path is where it counts.
2. Recline re-check. Tightening can shift the angle, so look at the newborn indicator again after everything is snug. It has a way of drifting while you were focused on the straps.
3. Tether check, forward-facing only. Right anchor? Hooked properly? Snug with no twists? A twisted tether is a weakened tether.
4. Harness check. Buckle the kid in, tighten, then try to pinch the harness vertically at the collarbone. Pinch a fold? Too loose. Keep tightening. Chest clip at armpit level. Not on the belly. Not up at the neck. Armpits.
5. The twist patrol. Eyeball every strap and belt in the system. Twists concentrate crash forces onto a thin line instead of spreading them across the strap. Flatten them all.
6. Belt path audit. One last look: is the belt in the correct path for the direction you installed? Rear-facing path for rear-facing, forward-facing path for forward-facing. This single check catches the most common serious error in the business.
And do not file these checks away as a one-time thing. Seats loosen over weeks of normal driving. Kids grow and the harness needs moving up. Winter coats come off in spring and suddenly the harness that fit fine is swimming. A thirty-second check every week or two is one of the highest-value habits in parenting. Right up there with checking the milk expiration date.
Common Installation Mistakes Parents Make
Car seat technicians see the same short list of errors at nearly every inspection event. Read it now, and you get to skip the embarrassed ‘oh no’ moment later:
• Wrong belt path. Rear-facing path used for a forward-facing install, or the reverse. The fix is embarrassingly simple: match the path to the direction, using the color-coded labels. Blue usually means rear, red or orange means forward.
• Skipping the top tether. The highest-value skipped step in the entire forward-facing world. If it faces forward, it gets tethered. Tattoo number two.
• LATCH plus seat belt together. It feels like belt-and-suspenders safety. It is actually untested-forces territory. One method, unless both manuals explicitly allow the combo.
• Forgetting the 65-pound LATCH rule. Kid plus seat over 65 pounds combined means the lower anchors retire and the seat belt takes over. Do the math once, write it on a sticky note if you have to.
• The loose install. More than an inch at the belt path, almost always because the seat was not compressed while tightening. Remember the knee. The knee is your friend.
• The loose harness. Straps you can pinch at the collarbone, or a chest clip that migrated down to the belly. Snug it up, clip at the armpits.
• Harness height flipped. Straps below the shoulders forward-facing, or above the shoulders rear-facing. Rear at or below, forward at or above. You have this memorized now.
• Aftermarket extras. Cute strap covers, third-party head inserts, seat protectors, dangling toys. If it did not come in the box and the manufacturer did not make it for your model, it does not go on the seat. These things compress in a crash, shift the harness, and void the seat’s testing. The plain seat is the safe seat.
• Expired or crashed seats. Seats expire, usually six to ten years from the manufacture date stamped on the shell. And any seat in a moderate or severe crash gets replaced, no matter how fine it looks. Plastic hides damage well. Do not trust your eyes on this one.
If you just recognized your own install somewhere in that list, welcome to the club. It is a very large club. Every item on it is fixable in minutes, and now you know.
When to Get Professional Help
Nobody hands out medals for installing a car seat solo. Free expert help exists in most areas, so use it. A certified Child Passenger Safety Technician, a CPST, is trained for exactly this: teaching parents to install correctly, not just doing it for them. Fire stations, hospitals, and police departments run free inspection events all the time. NHTSA keeps a search tool for finding one near you: find a car seat inspection station.
Bring both manuals. The car seat one and the vehicle one. A good tech will teach you to do the install yourself, because you are the one who will redo it after cleanings, vacations, and car swaps. And if your situation has any complications, an older car, three seats squeezed across one row, a child with medical needs, treat professional help as required rather than optional.
Our Research Method
No magic here, just homework. This guide was built from current NHTSA and AAP child passenger safety guidance, the installation manuals and support pages of the major car seat brands and the checklists real CPSTs use at inspection events. Specs, limits, and regulations were verified in October 2027. But models and model years vary, so your car seat manual and your vehicle owner’s manual always get the last word on your specific setup.
Frequently Asked Questions
Can I install a car seat with both LATCH and the seat belt?
Short answer: no. Unless both your car seat manual and your vehicle manual explicitly allow it, which is rare, use one method only. Doubling up changes how crash forces travel through the seat in ways it was never tested for, and it can mask the fact that one of the two systems is actually loose.
How do I know if my car seat is tight enough?
The inch test is your answer. Grip the seat at the belt path and push it side to side and front to back. Under an inch of movement means you are good. Test at the belt path, not the top of the seat, which always moves more. Then do the harness pinch test at your child’s collarbone for good measure.
Do I need a car seat LATCH anchor kit for an older car?
Almost certainly not. A proper seat belt install is just as safe as LATCH, so older cars are completely fine as they are. It is worth asking your dealer about a tether anchor retrofit for forward-facing seats, since the tether matters so much. Skip the generic universal kits online, and only use manufacturer-approved parts installed professionally.
When should I switch from LATCH to seat belt installation?
When your child plus the car seat together weigh more than 65 pounds, retire the lower LATCH anchors and switch to a seat belt install. The top tether stays in use for forward-facing. Your seat’s label or manual gives you the seat weight, so the math takes ten seconds.
Can I install a car seat in the front seat?
Only when there is genuinely no back seat, like a single-cab truck, and only with the airbag switched off. Airbags deploy violently and can kill a child in a car seat. The back seat is always the safest spot, and NHTSA says kids should ride back there until at least age 13.
How do I install an infant car seat without the base?
Set the carrier rear-facing in the back seat and thread the car’s lap and shoulder belt through the carrier’s baseless belt path, usually marked with blue guides. Buckle, lock the retractor, press the carrier firmly into the seat while feeding the slack back, and confirm under an inch of movement at the belt path. Lock the handle in the travel position your manual requires.
Should the car seat move a little at the top?
Yes, and this freaks out every new parent. Some movement at the top of a rear-facing seat is completely normal. The safety test happens at the belt path, where the LATCH strap or seat belt actually holds the seat. Under an inch there means a solid install, wiggle up top notwithstanding.

Aiden is the founder and editor of CarSeatHaven. He researches NHTSA safety standards, AAP guidance, manufacturer manuals, and recall notices, and turns them into plain-language car seat guides for parents.
